Introduction
Making bracelets with elastic rubber bands is an engaging, creative activity that appeals to both children and adults. This DIY craft isn’t just about fashion, it’s a fantastic way to explore creativity, improve fine motor skills, and spend quality time crafting something personal and unique. As the trends in wearable arts become both more inclusive and more innovative, rubber band bracelets are a staple not just because they’re simple, but because they provide an accessible means of entry into the world of crafting.
In this guide, we’ll explore everything from selecting your materials, mastering the technique, and designing unique patterns to provide not only comprehensive instructions but also inspiration for endless creativity. Whether you’re crafting alone or with children, this activity promises a rewarding experience tailored to both beginners and seasoned creatives.
We’ll dive into detailed step-by-step guidance, address common stumbling blocks, and offer pro tips and inspirations that align with real user queries. This blog will be your one-stop resource, ensuring that when you pick up elastic rubber bands, you’ll craft like a pro and let your imagination run wild.
Choosing Your Materials
Types of Elastic Rubber Bands
To get started, you’ll need to know what types of elastic rubber bands to use. While all may look similar, the variety in thickness, color, and elasticity can drastically change the outcome of your bracelet.
Core Insight: The choice of material drastically affects the style and durability of your bracelet.
- Standard Rubber Bands: These are easily accessible and are ideal for simple designs. They’re available in various sizes and colors.
- Specialty Bands: Brands like Rainbow Loom offer bands crafted specifically for bracelet making, often in vibrant colors and a slightly softer texture.
- Sizes and Colors: Consider using a mix of colors for more creative designs. Storing bands in a container organized by color can ease your crafting process.
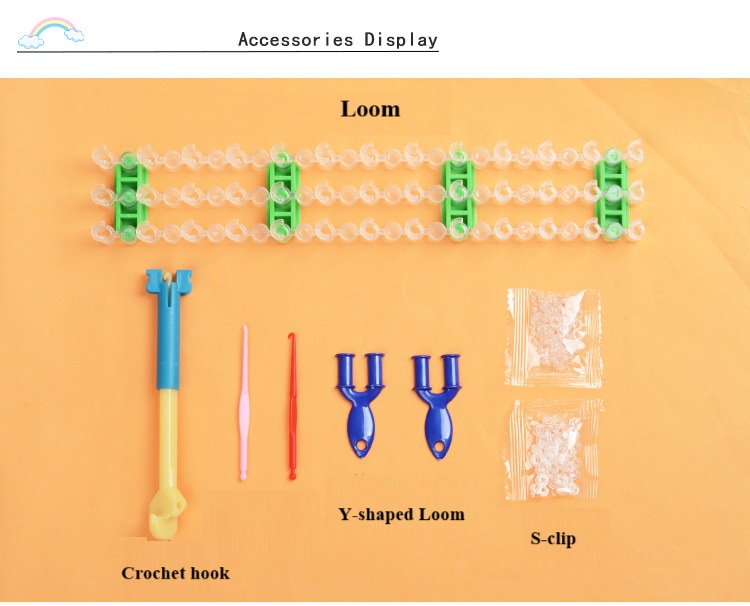
Tools You’ll Need
Some basic tools can elevate your crafting process and help you achieve more intricate designs.
- Loom Kits: While optional, loom kits can facilitate complex patterns and are ideal for those seriously diving into bracelet making.
- Crochet Hook: Often included in loom kits, these are useful for weaving bands without damaging them.
- Clips: S-clips or C-clips hold the ends of the bracelet together, providing a clean finish and ensuring durability.
Product Detailed Overview
- Material Quality: Our rubber bands are made from high-quality, flexible materials that ensure durability and comfort. They are designed to withstand stretching without breaking and are gentle on the skin.
- Size and Color Variety: We offer a wide range of sizes to accommodate various skill levels and design preferences. Color packs include everything from neon to pastel, allowing for vibrant or subtle creations.
- Eco-Friendly Options: For environmentally conscious consumers, we offer biodegradable rubber bands that combine quality with sustainability.
- Custom Kits: Our kits include not only bands but all necessary tools and clips, making them ideal for beginners and experienced crafters alike. Customization options are available for bulk orders.
- Packaging: Each set is packaged with care, providing a user-friendly experience with organized compartments for easy access and storage.
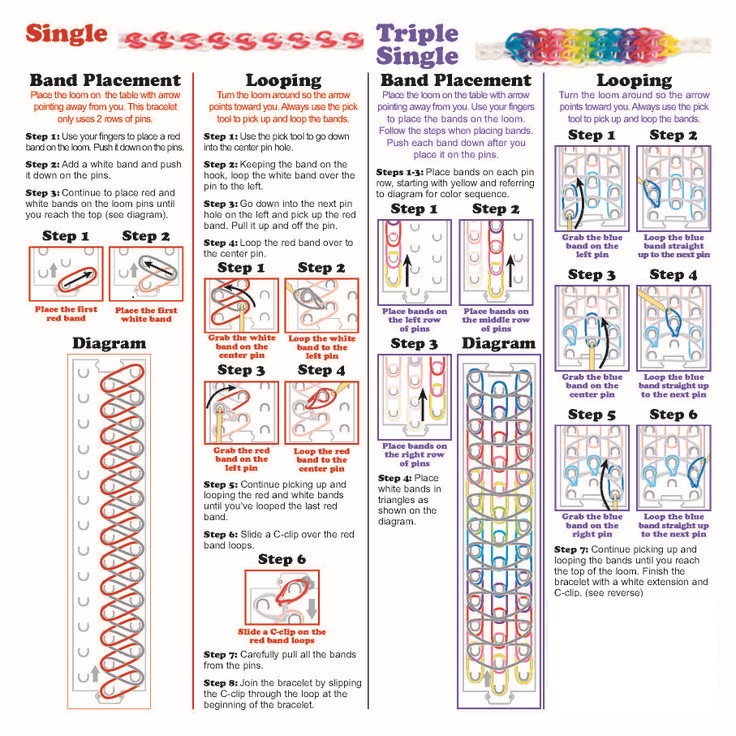
Basic Techniques for Elastic Band Bracelet Making
Starting with a Single Loop
The single loop technique is the foundation of rubber band bracelet making. It’s simple, beginner-friendly, and provides quick satisfaction.
- Initial Setup: Place the first band on your fingers in a figure-eight or infinity shape.
- Building Upon Loops: Add the next band by pulling it through the loop and holding it steady. This technique can be repeated to create a length suited for your wrist size.
- Closure: Use a clip to secure both ends once you reach your desired length.
Mastering the Fishtail Pattern
The fishtail pattern is a step up from single loops, providing a more intricate and visually appealing design.
Core Insight: The fishtail pattern combines elegance and simplicity, ideal for crafting more sophisticated designs.
- Initial Technique: Place three bands over your fingers or loom. Take the bottom band and pull it over the higher two bands.
- Repeat and Sustain: Continue adding new bands and pulling the bottom over until the bracelet reaches desired length.
- Completing and Securing: Finish by clipping the ends together, ensuring each band is firmly woven.
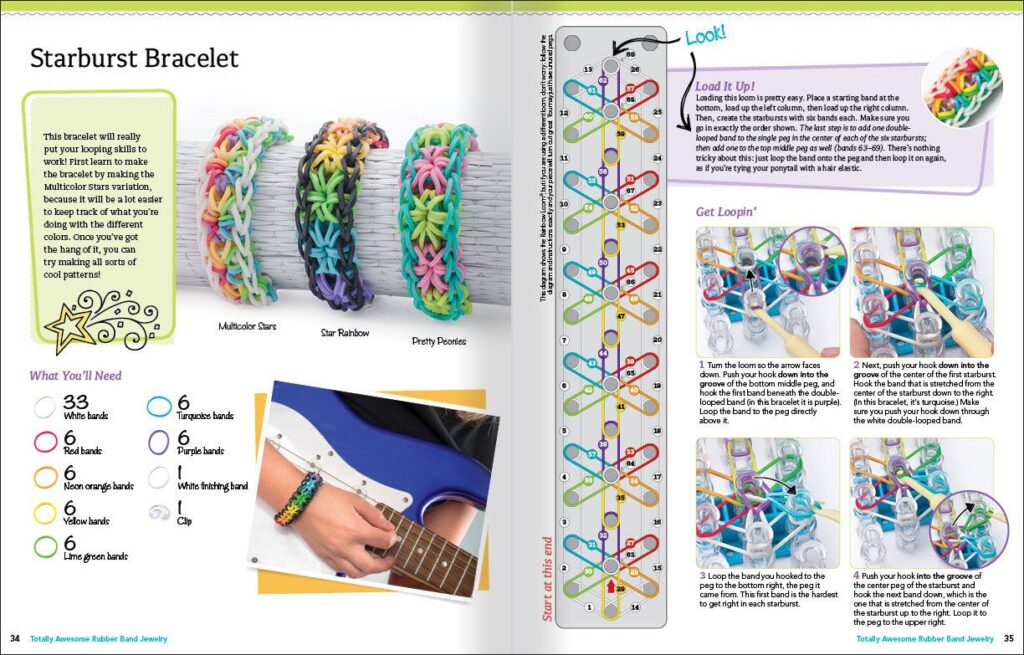
Additional Patterns: Advanced Techniques
For those looking to take crafting further, exploring advanced techniques like the hexafish or ladder patterns will enrich the experience. Loom kits often come with guides to assist you in learning these.
Designing Unique Bracelets
Color Theory: Making Your Bracelets Pop
Understanding color theory can enhance the aesthetic appeal of your creations.
- Complementary Colors: Choose colors opposite each other on the color wheel for striking contrast.
- Monochrome Magic: Use variations of the same color for tonal sophistication.
- Pattern Creativity: Mix and match to create patterns like stripes or checkerboards.
Inspiration for Creative Designs
Finding inspiration can help you break out of your comfort zone and explore new designs.
- Trend Following: Browse platforms like Pinterest for trendy designs, adapting them for rubber bands.
- Personal Themes: Create designs that reflect personal interests – sports teams, favorite colors, etc.
- Seasonal Designs: Craft holiday-themed bracelets to celebrate seasons or special occasions.
Adding Beads and Charms
Incorporate beads and charms for a personalized touch. Thread them onto bands to embed them directly within the design, elevating the aesthetic with little extra effort.
Conclusion
Crafting rubber band bracelets is a fulfilling activity that offers rewards beyond the finished product. It stimulates creativity, enhances dexterity, and provides a platform for self-expression.
Final Value Proposition: Whether you’re crafting solo or guiding young hands, rubber band bracelet making is an opportunity for creativity and connection that is as engaging as it is accessible.
Harness your newfound skills, explore endless designs, and feel empowered to lead workshops, contribute tutorials, or simply craft with loved ones. For purchasing quality materials, check our product page or related guides for more insights on nurturing your creative journey.
References Section
Internal Links:
External Links:
Explore more crafting tips and tricks, and start your journey into making elastic rubber band bracelets an artful exploration of creativity!